The Chrome Force-Installed Extension List policy lets you install and manage browser extensions for Google Chrome on macOS and Windows devices. Use this policy to force install the JumpCloud Go and JumpCloud Password Manager browser extensions, as well as any other extensions available in the Chrome Web Store. Force-installed extensions are automatically installed by Chrome without user interaction, and users are unable to remove them.
This policy is designed for organizations that do not use Google Workspace and Chrome Browser Cloud Management (CBCM). For organizations using CBCM, instead manage extensions using the Force-Installed Extension List within the Apps & Extensions page of the Google Admin Portal. See Google’s CBCM and Create a Universal Browser Patch Policy.
You can use this policy to install the JumpCloud Go browser extension on managed devices, which is required to use JumpCloud Go. JumpCloud Go enables secure passwordless user authentication to JumpCloud-managed web resources. See Get Started: JumpCloud Go.
Prerequisites
- The target device is running macOS or Windows and the JumpCloud agent is installed. See Install the Mac Agent and Install the Windows Agent.
- Google Chrome is installed on the target device.
Creating a Mac Chrome Force-Installed Extension List Policy
To create a Mac Chrome Force-Installed Extension List Policy:
- Log in to the JumpCloud Admin Portal.
- Go to DEVICE MANAGEMENT > Policy Management.
- In the All tab, click (+).
- On the New Policy panel, select the Mac tab.
- Select the Chrome Browser Force-Installed Extension Policy from the list, then click configure.
- (Optional) On the New Policy panel, enter a new name for the policy, or keep the default. Policy names have to be unique.
- (Optional) For Policy Notes, enter details like when you created the policy, where you tested it, and where you deployed it.
- Under Settings complete these fields:
- Select JumpCloud Go to force install the browser extension on selected devices.
- Select JumpCloud Password Manager to install the browser extension on selected devices.
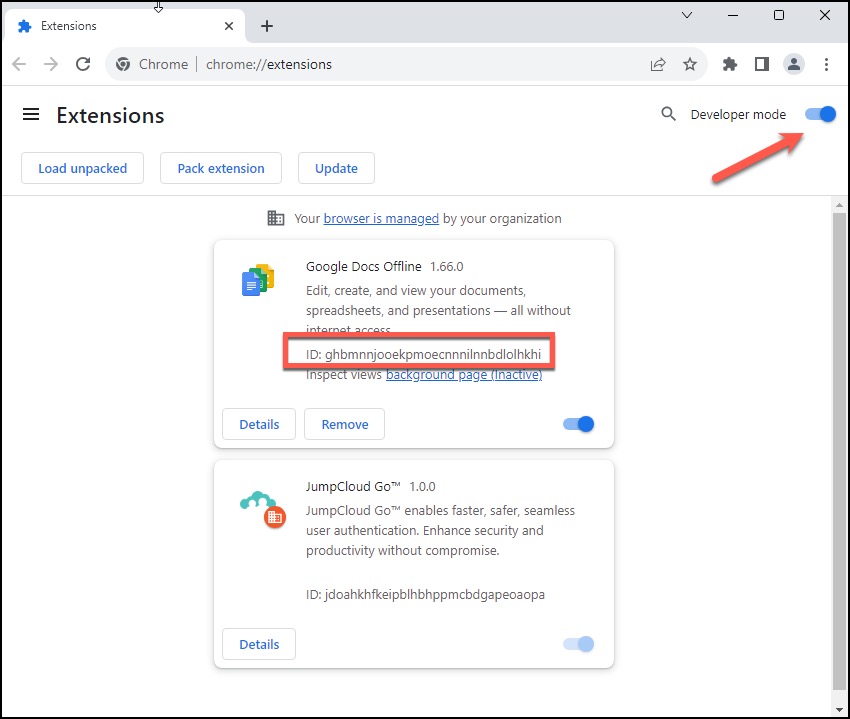
- (Optional) For Additional Chrome Browser Extensions, enter the Extension ID of any additional browser extensions you wish to force install. The extension ID is a 32-letter string found in the extension details in the Chrome Web Store, or in Chrome > Extensions > Manage Extensions with Developer mode enabled.
- (Optional) Define an update URL separated by a semicolon (;). If specified, the update URL should point to an Update Manifest XML document. By default, the Chrome Web Store's update URL is used.
- (Optional) Select the Device Groups tab. Select one or more device groups where you will apply this policy. For device groups with multiple OS member types, the policy is applied only to devices running a supported OS.
- (Optional) Select the Devices tab. Select one or more devices where you will apply this policy.
For this policy to take effect, you must specify a device or a device group in Step 10 or Step 11.
- Click save.
Creating a Windows Chrome Force-Installed Extension List Policy
To create a Windows Chrome Force-Installed Extension List Policy
- Log in to the JumpCloud Admin Portal.
- Go to DEVICE MANAGEMENT > Policy Management.
- In the All tab, click (+).
- On the New Policy panel, select the Windows tab.
- Select the Chrome Browser Force-Installed Extension Policy from the list, then click configure.
- (Optional) On the New Policy panel, optionally enter a new name for the policy, or keep the default. Policy names have to be unique.
- (Optional) For Policy Notes, enter details like when you created the policy, where you tested it, and where you deployed it.
- Under Settings complete these fields:
- Select JumpCloud Go to force install the browser extension on selected devices
- Select JumpCloud Password Manager to install the browser extension on selected devices.
- (Optional) For Additional Chrome Browser Extensions, enter the Extension ID of any additional browser extensions you wish to force install. The extension ID is a 32-letter string found in the extension details in the Chrome Web Store, or in Chrome > Extensions > Manage Extensions with Developer mode enabled.
- (Optional) Define an update URL separated by a semicolon (;). If specified, the update URL should point to an Update Manifest XML document. By default, the Chrome Web Store's update URL is used.
- (Optional) Select the Device Groups tab. Select one or more device groups where you will apply this policy. For device groups with multiple OS member types, the policy is applied only to the supported OS.
- (Optional) Select the Devices tab. Select one or more devices where you will apply this policy.
For this policy to take effect, you must specify a device or a device group in Step 10 or Step 11.
- Click save.
Removing Devices from a Chrome Force-Installed Extension List Policy
If you used this policy to deploy a browser extension to your devices, you can remove the devices or device groups from the policy in the Admin Portal to remove the extension on those devices.
To remove device or device groups from the policy:
- Log in to the JumpCloud Admin Portal.
- Go to DEVICE MANAGEMENT > Policy Management.
- Select the Chrome Browser Force-Installed Extension Policy from the list, then click configure.
- For device group associations: Select the Device Groups tab, locate the device group you wish to remove, and clear to remove the device group association.
Removing a device group from the policy will remove installed extensions on all devices in that group.
- For direct device associations: Select the Devices tab, select any devices you wish to remove, and clear the checkbox for the devices to remove the associated devices.

