Use JumpCloud OpenID Connect (OIDC) Single Sign On (SSO) to give your users secure and convenient access to their OIDC-capable web applications with a single set of credentials. You can use the Custom OIDC App connector with any application that supports OIDC-based SSO.
Preconfigured OIDC applications are not currently available in the JumpCloud catalog. For now, you must use the Custom OIDC App to configure OIDC applications. You need in-depth knowledge of the Relying Party’s (RP) OIDC capabilities and requirements to use the OIDC connector.
Prerequisites
- The RP application must support a grant type of authorization code
- You must know the Redirect URI for the application you want to configure with OIDC
- You must know the Login URL that the RP uses to start the login flow
- Determine if the app you are configuring can protect a client secret or if it uses a public client
- Determine any needed claims/attributes that the RP wants
Configuring the Custom OIDC Connector
To configure JumpCloud
- Log in to the JumpCloud Admin Portal.
- Go to USER AUTHENTICATION > SSO Applications.
- Click + Add New Application. There are two options:
- Type OIDC in the Search field and select it from the dropdown.
- Click Next.
- Select Custom Application.
- Click Next.
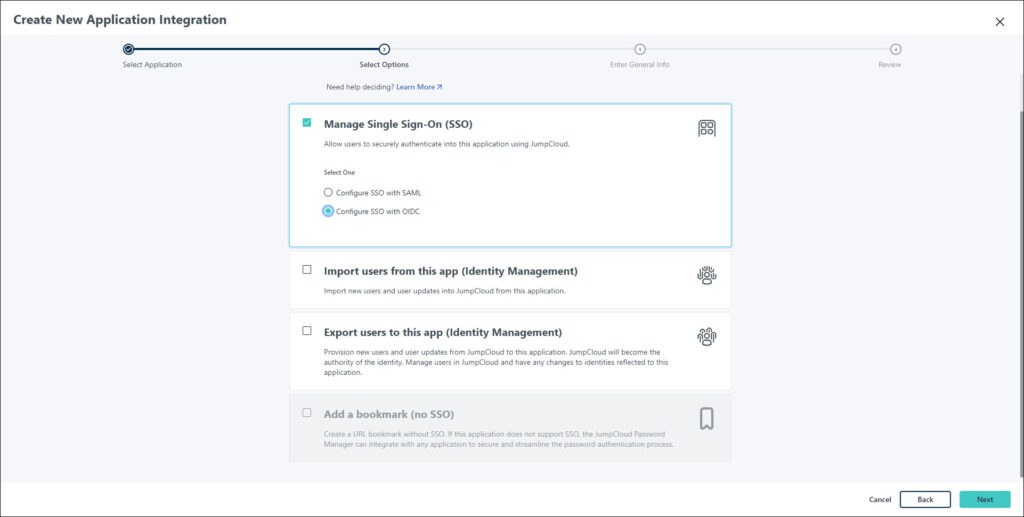
- Select Manage Single Sign-On and then Configure SSO with OIDC
- Click Next.
- Type OIDC in the Search field and select it from the dropdown.

- In the Display Label, type your name for the application. Optionally, you can enter a Description, adjust the User Portal Image and choose to hide or Show in User Portal.
- If using the Custom Application workflow, the default color indicator will be displayed in the Admin Portal.
- This can be changed by selecting Logo under Display Option in the General Info tab of the application configuration.
- If using the OIDC template from the dropdown, the default Custom OIDC App logo will be displayed in the Admin Portal.
- Click Next and then Configure Application.
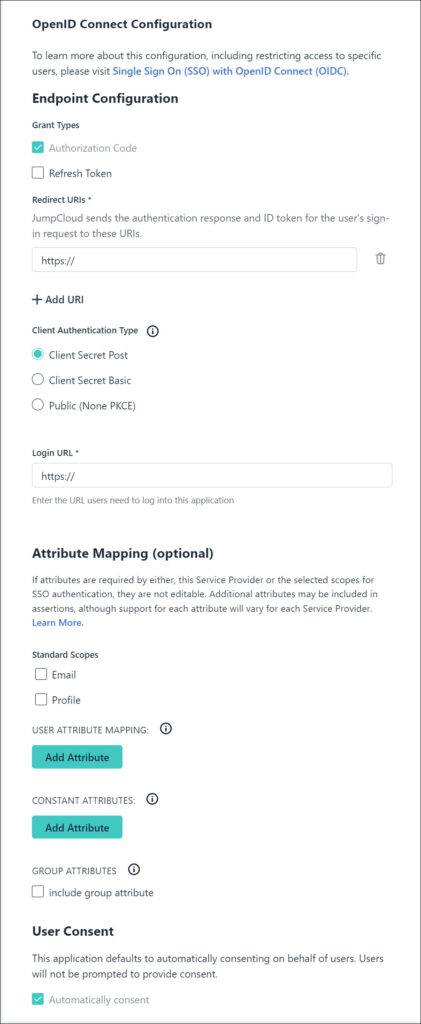
- In the SSO tab, the following window will appear.

Endpoint Configuration
- Grant Types:
- Authorization Code is checked by default and cannot be deselected
- Refresh Token can be checked at a later time if you wish to refresh your connector's token
- Enter one or multiple Redirect URIs (Uniform Resource Identifier) with the value(s) supplied by the RP.
- Click +Add URI to add more than one URI
- Select the appropriate Client Authentication Type:
- Client Secret POST - the client authorizes itself providing the secret in the HTTP request body as a form parameter
- Client Secret Basic - the simplest method of client authentication using client secrets. It is a method where an application uses the HTTP Basic Authentication Scheme to authenticate with the authorization server
- Public (None PKCE) - Client authentication set to none and with the use of Proof Key of Code Exchange (PKCE) was created as a secure substitute for the OAuth implicit flow, where the client receives access tokens as the result of authorization
The client authentication type will depend on what is supported by the RP.
- Enter the Login URL with the value supplied by the RP.
Attribute Mapping (optional)
- Add a Standard Scope by selecting Email or Profile.
- Add User and Constant attributes by clicking Add Attribute.
- Select include group attribute for claims/attributes that are required for your individual OIDC SSO needs. For more information about claims, see OIDC Attributes (Claims).
If the RP supports it, you can add more than what is required.
- Under User Consent, Automatically consent is selected by default and cannot be deselected.
- Click activate.
- If the client is not a public client, then a window will display the client secret.
The client secret will only be displayed once. Copy and store the Client ID and Client Secret in a safe location, like a password manager.
- Click Got It.
You can regenerate your client secret at any time.
To configure the RP
Enter the following information to the RP:
- The application’s OIDC client ID
- If the client is not public, the application’s OIDC client secret
- JumpCloud’s OIDC well-known config - https://oauth.id.jumpcloud.com/.well-known/openid-configuration
JumpCloud Well-Known OpenID Configuration
- https://oauth.id.jumpcloud.com/.well-known/openid-configuration
- https://oauth.id.jumpcloud.com/.well-known/jwks.json
JumpCloud OpenID Auth Endpoint
- https://oauth.id.jumpcloud.com/oauth2/auth
JumpCloud OpenID Issuer Endpoint
- https://oauth.id.jumpcloud.com/
JumpCloud OpenID Token Endpoint
- https://oauth.id.jumpcloud.com/oauth2/token
JumpCloud OpenID User Info Endpoint
- https://oauth.id.jumpcloud.com/userinfo